Configure a Yorc Orchestrator and a Location
Now we must define an orchestrator and one or more locations (where we will actually deploy applications). In Alien4Cloud every location is managed by an orchestrator.
The Alien4Cloud Yorc Plugin installed in the previous section allows to create the Yorc orchestrator and locations.
Several location types are available ; they correspond to the infrastructure types supported by Yorc (OpenStack, AWS, Kubernetes, etc.). In order to deploy applications and run them on a given infrastructure, Yorc must be properly configured for that infrastructure (see “Infrastructure configuration” chapter in Yorc documentation).
Configure a Yorc Orchestrator
- To create an orchestrator, go to
 and in the
  sub-menu. Create an orchestrator named
 Yorcwith the following named plugin: - Yorc Orchestrator Factory : 3.0.0
At this moment your orchestrator is created but not enabled. Click on your orchestrator to see the information page, and then
click on the configuration menu icon  .
.
In the Driver configuration part, add the URL of your Yorc server (should respect the format: http://yorc-ip:8800) and return to the previous page to enable your orchestrator.
- If Yorc is secured (ssl enabled):
- the yorc URL should use the
httpsprotocol - the CA authority used to sign the Yorc certificates should be imported in the Java truststore ; otherwise, check
insecureTL
- the yorc URL should use the
Configure an OpenStack Location
Once your orchestrator is created and enabled, go to the locations page by clicking on 
Create a new location clicking on  and provide a location name. Select
 OpenStack in the infrastructure type drop-down.
The details page of your location should appear.
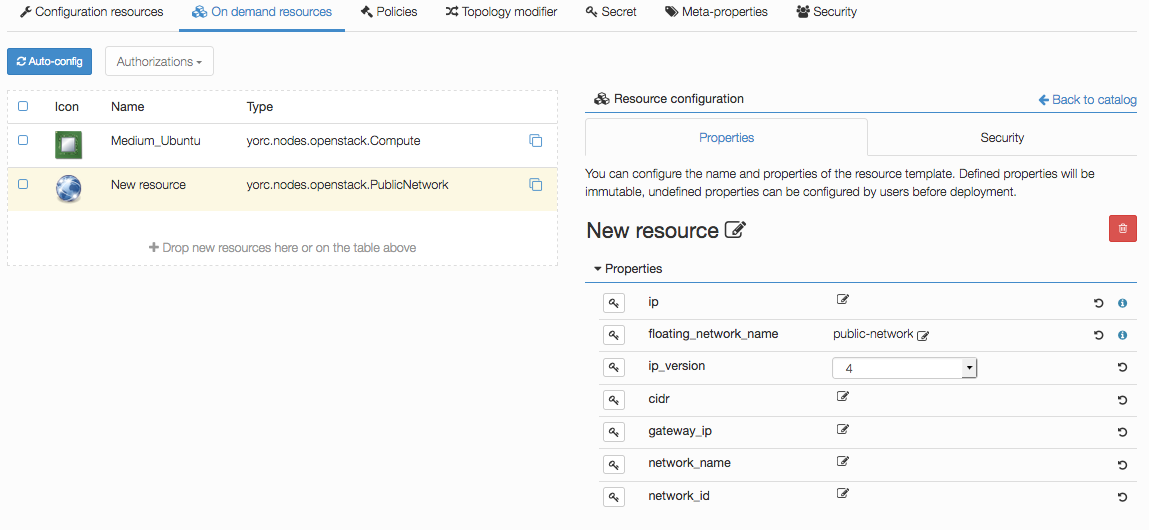
Go to  and add the following resources:
- yorc.nodes.openstack.PublicNetwork
- yorc.nodes.openstack.Compute
Click on the network and set floating_network_name to the name of your OpenStack public network for the tenant where the Yorc instance
is deployed.
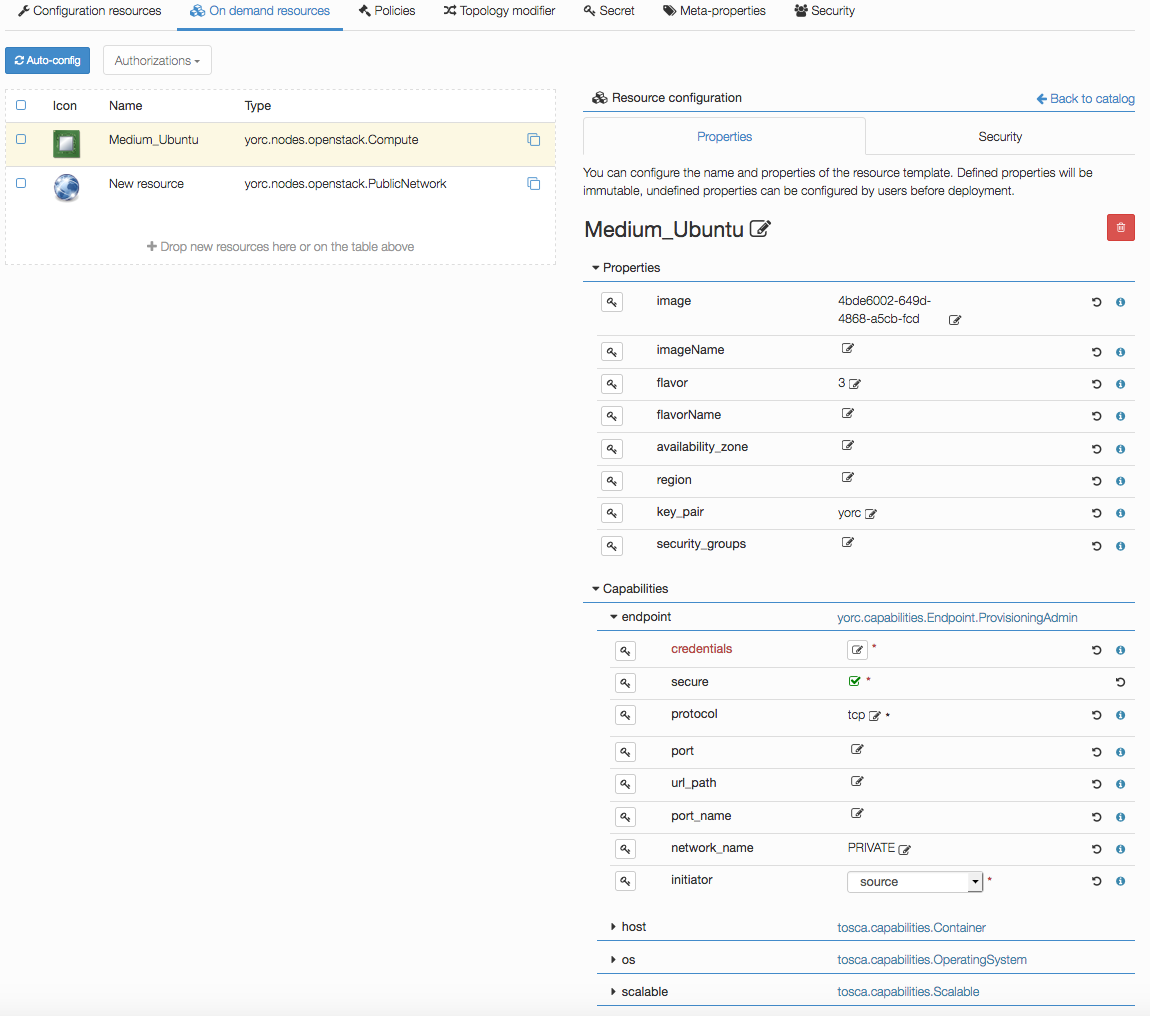
Click on the compute and set the image to the id of your image in OpenStack (in order to use our samples in next sections, please use
an Ubuntu 14.04+ or Centos 7.2+ image), the flavor to 3 (medium for a default OpenStack config).
Set key_pair to the OpenStack keypair that correspond to the private key that you stored under ~/.ssh/yorc.pem during your Yorc server setup.
Finally, in the endpoint capability of the Compute, open the credentials complex type and set the user to a user available in your image (generally ubuntu
for Ubuntu cloud images).
This user will be used to connect to this on-demand compute resource once created, and to deploy applications on it (while the user used to create this on-demand resource is defined in the Yorc server configuration).
Configure a Slurm Location
Go to the locations page by clicking on
Create a new location clicking on and provide a location name. Select Slurm in the infrastructure type drop-down.
The details page of your location should appear.
Go to and add the following resource:
- yorc.nodes.slurm.Compute
Click on the compute, the following details should appear and show the endpoint credentials must be edited:
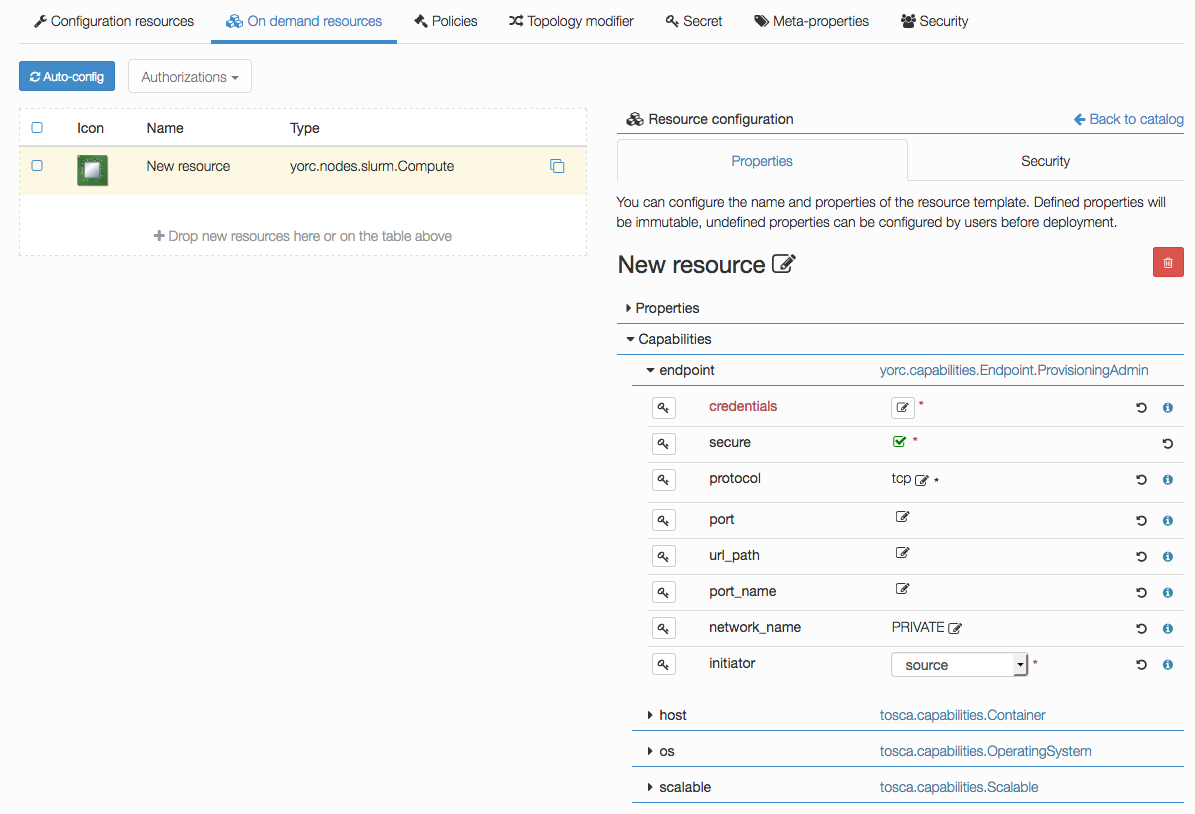
Edit credentials and specify a user that will be used to connect to this on-demand compute resource once created,
and to deploy applications on it (while the user used to create this on-demand resource is defined in the Yorc server configuration):

You could define here as well either a password, provided as a token parameter value (token_type being set to password),
or a private key by editing the keys parameter and adding a new key 0 with a value being the path to a private key, as below :

If no password or private key is defined, the orchestrator will attempt to use a key ~/.ssh/yorc.pem that should have been defined during your Yorc server setup.
Configure a Hosts Pool Location
Go to the locations page by clicking on
Create a new location clicking on and provide a location name. Select HostsPool in the infrastructure type drop-down.
The details page of your location should appear.
Go to and add the following resource:
- yorc.nodes.hostspool.Compute
Click on the compute, the following details should appear:
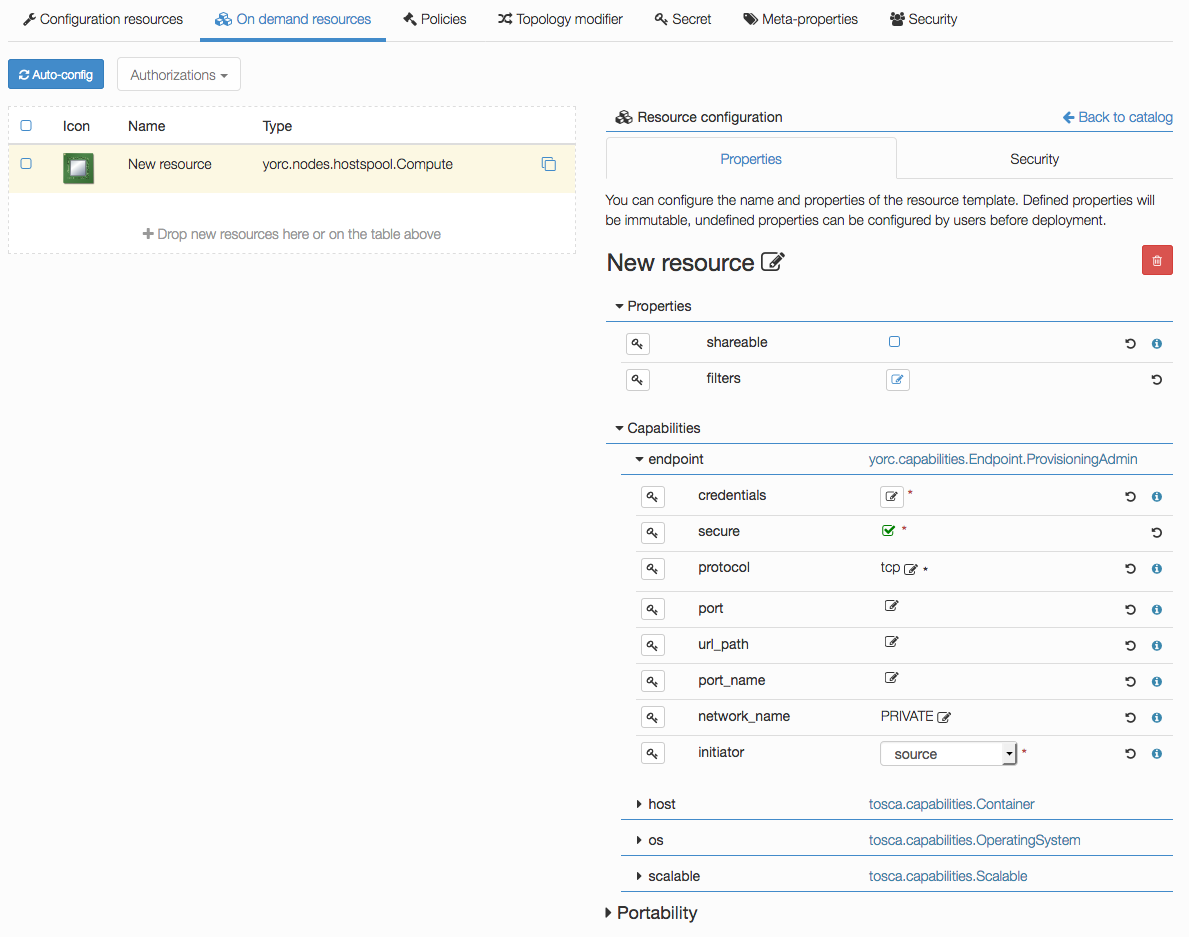
You can select the property shareable if you want to make this compute node shareable, so that different deployments could use this same resource.
Credentials don’t have to be defined here. For hosts in a Hosts Pool, credentials are defined in the Yorc server configuration.
Configure a Google Cloud Platform Location
Go to the locations page by clicking on
Create a new location clicking on and provide a location name. Select Google Cloud in the infrastructure type drop-down.
The details page of your location should appear.
Go to and add the following resource:
- yorc.nodes.google.Compute
Click on the compute, the following details should appear, with here several properties set as explained below:
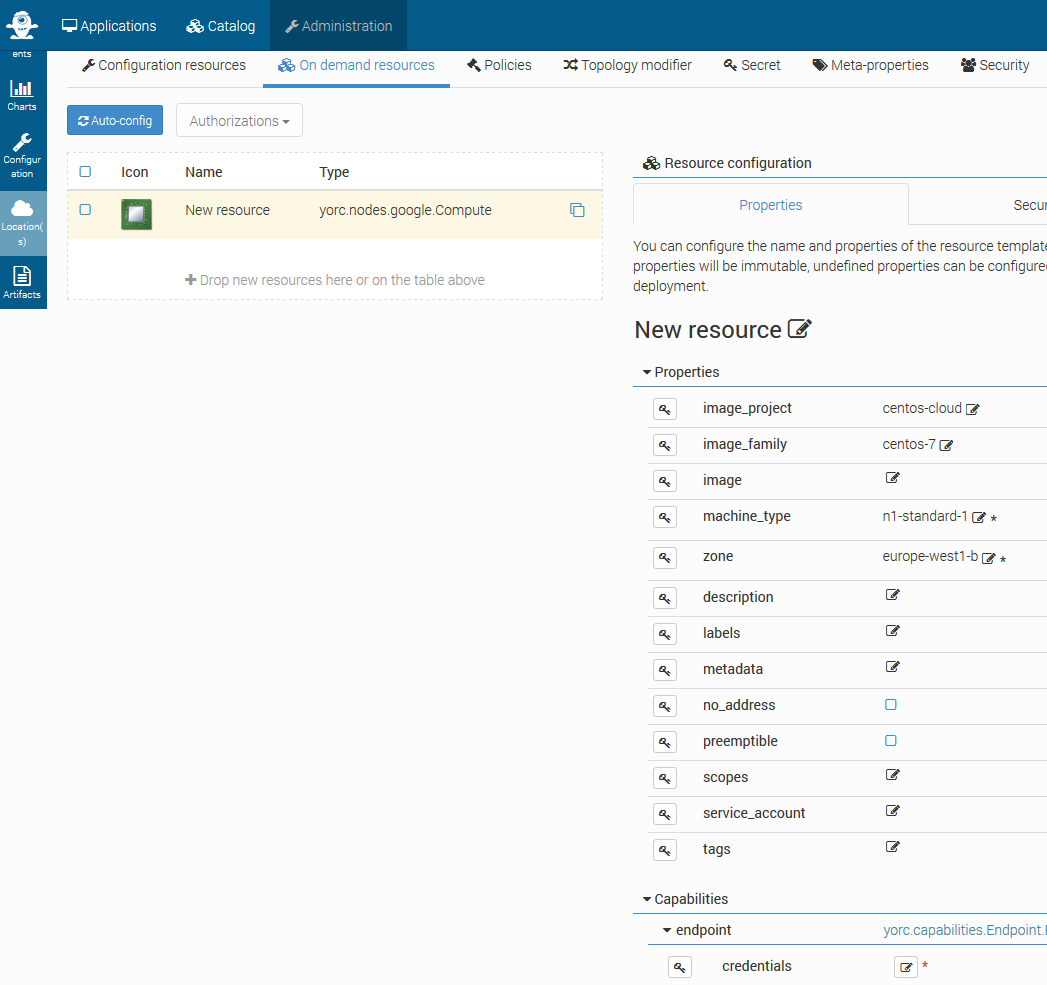
Specify which image to use to initialize the boot disk, defining properties image_project, image_family, image.
- At least one of the tuples
image_project/image_family,image_project/image,family,image, should be defined: image_projectis the project against which all image and image family references will be resolved. If not specified, and either image or image_family is provided, the current default project is used.image_familyis the family of the image that the boot disk will be initialized with. When a family is specified instead of an image, the latest non-deprecated image associated with that family is used.imageis the image from which to initialize the boot disk. If not specified, and an image family is specified, the latest non-deprecated image associated with that family is used.
See available public images described at Compute Engine Public Images.
For example, to use the latest CentOS 7 version, use image_project centos-cloud and image_family centos-7.
Set the machine_type value according to your needs in CPU and memory (default n1-standard-1).
See list of available machine types.
Set the mandatory parameter zone to define the zone on which the Compute Instance should be hosted.
See list of available regions and zones.
Edit credentials to provide a mandatory user name.
This user will be used to connect to this on-demand compute resource once created, and to deploy applications on it.

You could define here as well a private key by editing the keys parameter and adding a new key 0 with a value being the path to a private key, as below :
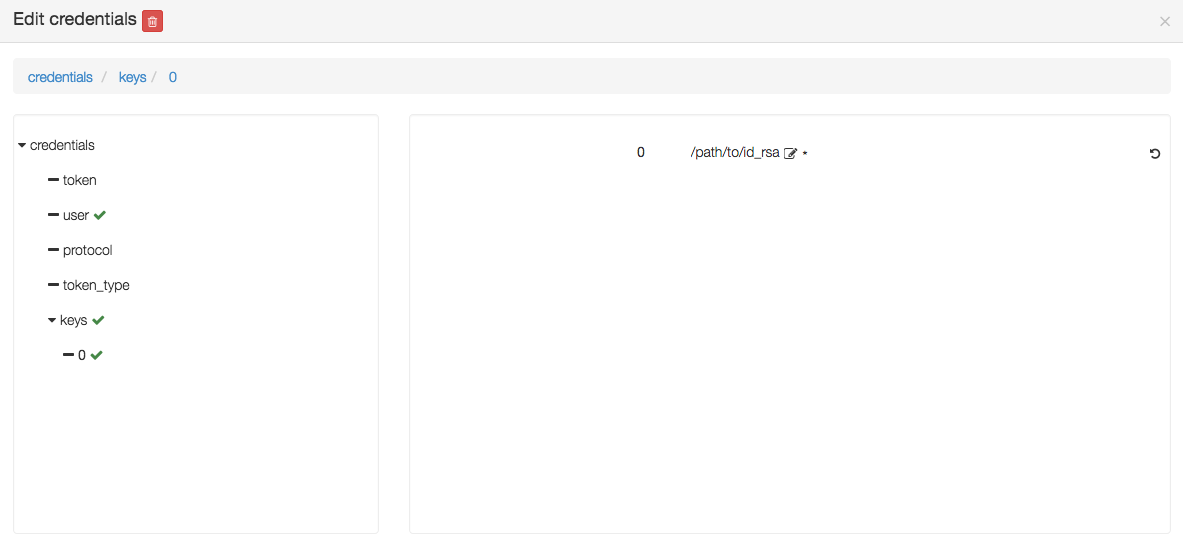
If no private key is defined, the orchestrator will attempt to use a key ~/.ssh/yorc.pem that should have been defined during your Yorc server setup.
The user you specify here must be defined, along with its associated public SSH key, either at your Google Project level, or at this Compute Instance level. See Google documentation for :
For example, assuming you have a private ssh key ./id_rsa and a public ssh key ./id_rsa.pub,
you can first create a file containing a user name and the public key content:
echo "user1:`cat id_rsa.pub`" > userkeys.txt
Then define this user and public key at the project level, using Google Cloud CLI:
gcloud compute project-info add-metadata --metadata-from-file ssh-keys=userkeys.txt
Then, by default, all compute instances will inherit from this user/public key definition, the user will be created on the compute instance and you will be able to ssh on your compute instance running:
ssh -i ./id_rsa user1@<your instance external ip address>
For details on other optional Compute Instance properties, see Compute Instance creation.
Configure an AWS Location
Go to the locations page by clicking on
Create a new location clicking on and provide a location name. Select AWS in the infrastructure type drop-down.
The details page of your location should appear.
Go to and add the following resources:
- yorc.nodes.aws.PublicNetwork
- yorc.nodes.aws.Compute
Click on the compute, the following details should appear:
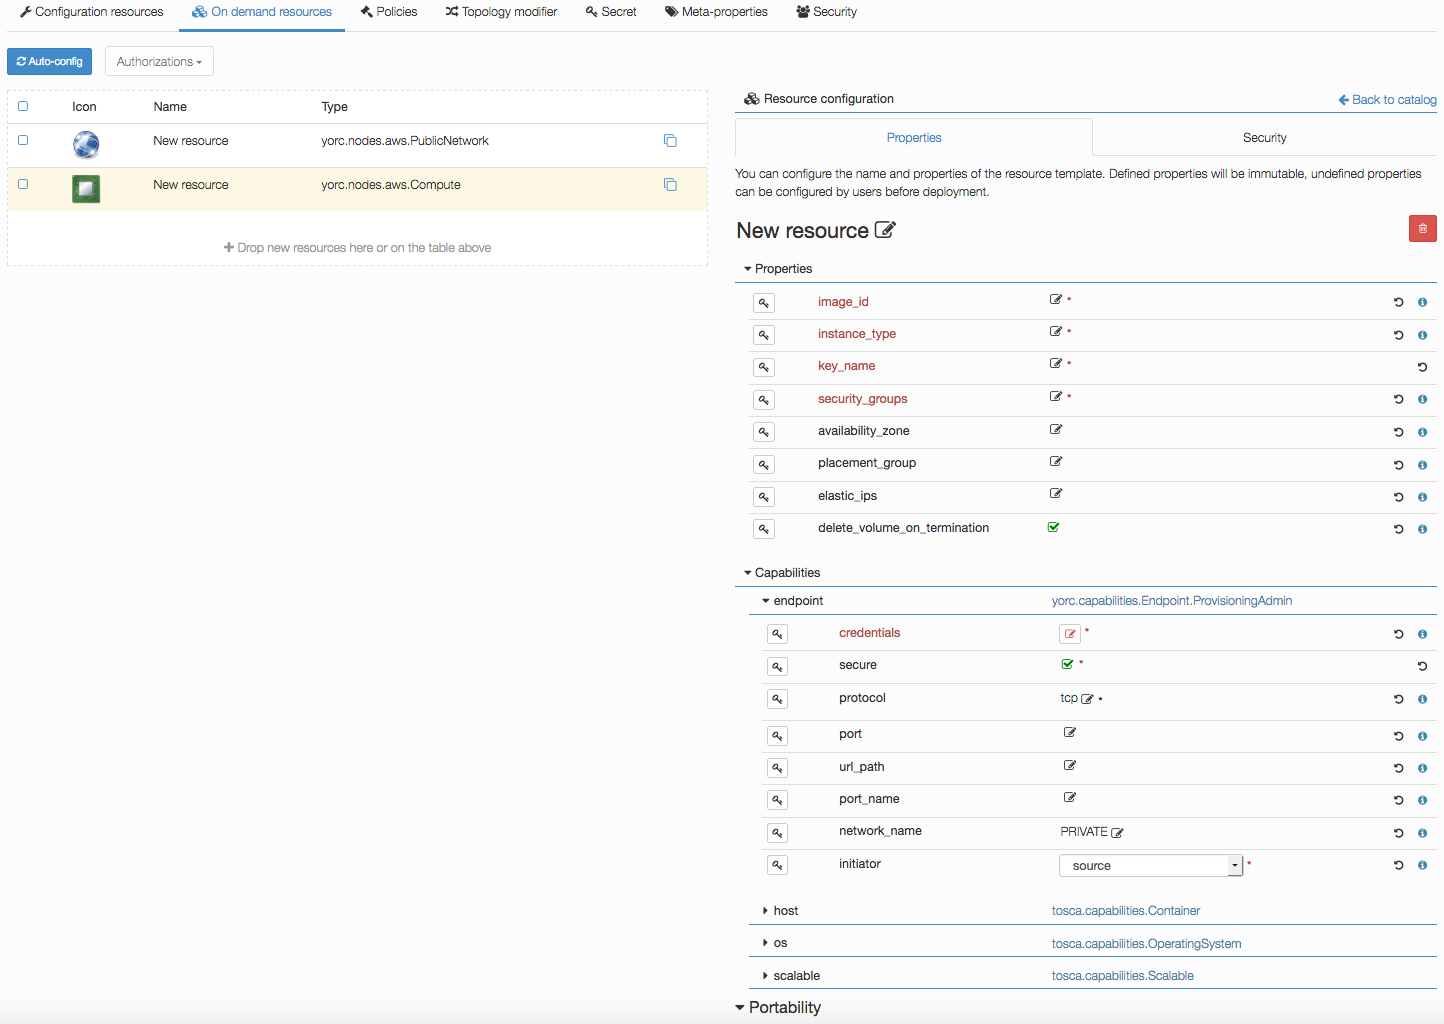
Edit mandatory parameters AWS image_id, instance_type, security_groups and key_name to provide the name of a key pair already known from AWS.
Edit credentials to provide a user name.
This user will be used to connect to this on-demand compute resource once created, and to deploy applications on it (while user credentials used to create this on-demand resource are defined in the Yorc server configuration).
Configure a Kubernetes Location
In order to deploy applications on a Kubernetes location, the Yorc orchestrator must be connected to a properly configured Yorc server (see “Infrastructure configuration” chapter in Yorc documentation ; the Yorc server must be able to connect to the Kubernetes cluster’s master).
Select Yorc orchestrator and go to the locations page by clicking on . Create a location named kubernetes (or a name of your choice)
and select Kubernetes on the infrastructure type drop-down. The details page of your location should appear.
Go to and search in the Catalog resources with type prefix org.alien4cloud.kubernetes.api.types (we’ll use k8s_api for this prefix).
You have to add the following resources:
k8s_api.Deploymentk8s_api.Containerk8s_api.Servicek8s_api.volume.*# the volume types needed by applications
Go to  view to setup modifiers on your location:
- add
Kubernetes modifierat the phasepost location match- add
Yorc modifier for kubernetesat the phasepost-node-match